Clinical Review
Select the appropriate tab to learn about completing Clinical Review in your province.
Clinical Review can be completed from the Intake window, regardless of your Workflow setup, or from the Workflow queue.
Select the dropdowns to learn more.
The Clinical tab in Intake is visible when Clinical Review is enabled for the prescription type (retail or compliance) being processed. While the tab is visible to all role types, only pharmacists have access to the Verify and Sign Rx(s) buttons. Clinical Review can always be completed at Intake, before Data Entry, even if your Workflow Preferences position it after Data Entry.
To complete Clinical Review from Intake:
-
Do one of the following to open the Intake window:
-
From the Workflow Workbench, select Intake.
-
From the Patient Profile, select Intake.
-
From the Fax tile, select a prescription fax and then Intake.
-
-
Search for and select a patient, if not already entered.
-
Optional - in the Data Entry tab, enter prescription details. If you don't enter prescription details before the clinical check, you can do so after.
-
Select the Clinical tab, if it's not already selected.
-
If a drug was not entered in the Data Entry tab, in the Drug Name field, search for and select a drug. The drug selection will write back to the Data Entry tab.
If you are performing the clinical check for multiple prescriptions, you can enter multiple drugs by separating them with a backslash (/). Each drug will be separated into its own shell in Intake with the patient copied over.
-
Select the Allergy Check, Pharmanet Check, and D.T Issues checkboxes if the checks were completed at Clinical Review.
If the prescription is parked after selecting the Allergy Check, Pharmanet Check, and D.T Issues checkboxes, they must be selected again when the prescription is processed.
-
Review the following clinical information:
-
Patient Profile - select the Profile button to view the prescriptions on the patient's Profile. The patient's EHR Profile can be viewed by selecting the EHR link.
A forced view of the EHR Profile will not occur in Rx Detail if the EHR Profile is viewed in Intake, unless a break in service occurs (e.g., navigate to another patient and return).
-
Allergies and Medical Conditions - select a record and the expander button
 to view additional details. Add or remove records by selecting the plus
  or minus
  buttons.
 -
Clinical History - select the Clinical History button
 to view a list of clinical notes in the Patient Folder. Detail a record to view more information. To add a clinical note, select the Add Clinical Note
  button.
 -
Audit History - select Rx > Audit History to view the audit history for the prescription. This button is only available for refills and reauthorizations.
-
-
Review any interaction checks, by highlighting the interaction and selecting Interactions Check. The interactions listed are between the selected drug and the drugs on the Patient Profile.
-
Interactions are sorted in descending order by severity: (1) Contraindicated, (2) Severe, (3) Moderate, and (4) Low.
-
Within each severity category, the interaction types display in the following order: (1) Drug-Allergy, (2) Drug-Drug, (3) Drug-Medical, and (4) Drug-Food.
If Clinical Review is completed before Data Entry, you will not be prompted with interactions when the prescription is processed into Rx Detail, since the interaction check has already been done. However, if clinical information was added since completing Clinical Review, the Interaction Detail window will appear in Rx Detail.
-
-
At the bottom, select Verify. The button will turn green and say Verified.
-
If multiple prescriptions are loaded in the Intake window, select the right arrow button
 at the top to move to the next one. Repeat steps 6 - 9 for the next prescription.
 -
Select Sign Rx(s). The Signature window appears. At the top right, the Rx(s) being signed field indicates the number of prescriptions being signed over the total number loaded in the Intake window.
-
Sign the prescription using one of the following methods:
-
Credential entry - initials of the signing Pharmacist are used.
-
Biometric fingerprint scan - initials of the signing Pharmacist are used.
-
Manual signature using a signature pad or mouse - the initials of the logged in Pharmacist user are assumed. However, the signature of the signing pharmacist is captured and appears on all prescription documentation.
 Not all signing methods are available
The methods available depend on the hardware installed at the workstation and whether an E-Signature has been set up for the pharmacist. See Signature Window for more information.
The Sign Rx(s) become turns green and says UnSign. The date and time the prescription was signed displays beside the button.
-
-
Do one of the following:
-
Select the Data Entry tab to continue processing the prescription(s). The prescription will progress through the remaining Workflow steps. In some situations, changes to the prescription will cause the signature to be revoked and Clinical Review will need to be completed again.
Scenarios where the signature is revoked
-
The drug is changed to a non-interchangeable in the Intake window or Rx Detail. A row is added to the Workflow Details window indicating the date and time of the signature removal, user (ADM), and the name and strength of the original drug and new drug. The prescription must flow through Clinical Review again and cannot be rejected back to this queue.
-
The prescription's drug or SIG is modified during an amend or rebill. No row is added for the signature removal in the Workflow Details window.
-
The patient is changed in the Intake window. No row is added for the signature removal in the Workflow Details window, as the signature is intended for a different patient.
-
-
Select the Dialogue tab to complete dialogue for the prescription(s).
-
Select Add to Workbench to place the current prescription back in the Data Entry queue.
-
To complete Clinical Review from the Workflow queue:
-
From the Workbench, select the Clinical Review queue. Prescriptions that are currently in the Clinical Review queue display in the prescription grid.

-
Select the prescription(s) that require clinical review.
-
Select Process. The prescription opens in the Clinical Review window.
-
Select the expanding arrow
 to open the clinical information section.
-
Select the Allergy Check, Pharmanet Check, and D.T Issues checkboxes if the checks are completed at Clinical Review.
If you park the prescription...
If the prescription is parked after selecting the Allergy Check, Pharmanet Check, and D.T Issues checkboxes, they must be selected again when the prescription is processed.
When these checkboxes are selected automatically...
If Display EHR Profile at Clinical is ON in More (...) > Pharmacy > Rx Detail, the EHR Profile displays automatically when a prescription is processed into a combined Technical Validation and Clinical Review window. Upon select OK in the EHR Profile window, the Allergy Check, Pharmanet Check, and D.T Issues checkboxes are automatically selected.
-
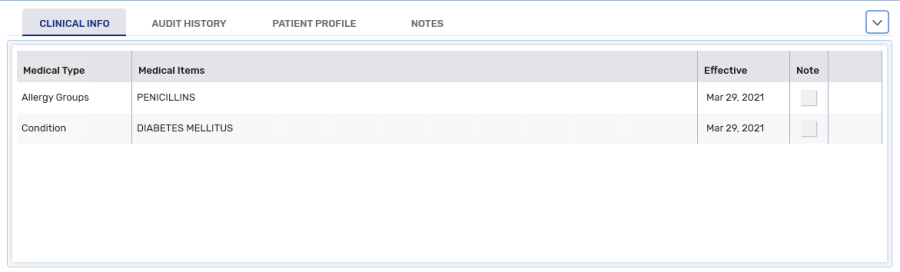
Review the clinical information in the following tabs.
-
Clinical Info - displays medical allergies and conditions.
What does the warning indicator  mean?
mean?
If a warning indicator
appears on the Clinical Info tab, that means a moderate, severe, contraindicated, or drug-allergy interaction exists. You must open the tab and review the information. If this is not done, you will be returned to the Clinical Review window upon selecting Sign Rx, and the Clinical Info tab will be forced open. You must select Sign Rx again to complete Clinical Review. -
Audit History - displays the history of the prescription, such as previous fills and authorizations.
-
Patient Profile - displays the prescriptions on the patient's Profile tab. The patient's PharmaNet Profile can be viewed by selecting the EHR link.
-
Notes - displays notes marked as Print in the Prescription, Prescriber, Drug and Patient Notes tabs.
-
-
Review any interaction checks, by highlighting the interaction and selecting Interactions Check. Interactions are sorted in descending order by severity: (1) Contraindicated, (2) Severe, (3) Moderate, and (4) Low. Within each severity category, the interaction types display in the following order: (1) Drug-Allergy, (2) Drug-Drug, (3) Drug-Medical, and (4) Drug-Food.

-
Select Sign Rx. The Signature window appears.
-
Sign the prescription using one of the following methods:
-
Credential entry - initials of the signing Pharmacist are used.
-
Biometric fingerprint scan - initials of the signing Pharmacist are used.
-
Manual signature using a signature pad or mouse - the initials of the logged in Pharmacist user are assumed. However, the signature of the signing pharmacist is captured and appears on all prescription documentation.
Not all signing methods are available
The methods available depend on the hardware installed at the workstation and whether an E-Signature has been set up for the pharmacist. See Signature Window for more information.
-
Clinical Review can be completed from the Intake window, regardless of your Workflow setup, or from the Workflow queue.
Select the dropdowns to learn more.
The Clinical tab in Intake is visible when Clinical Review is enabled for the prescription type (retail or compliance) being processed. While the tab is visible to all role types, only pharmacists have access to the Verify and Sign Rx(s) buttons. Clinical Review can always be completed at Intake, before Data Entry, even if your Workflow Preferences position it after Data Entry.
To complete Clinical Review from Intake:
-
Do one of the following to open the Intake window:
-
From the Workflow Workbench, select Intake.
-
From the Patient Profile, select Intake.
-
From the Fax tile, select a prescription fax and then Intake.
-
-
Search for and select a patient, if not already entered.
-
Optional - in the Data Entry tab, enter prescription details. If you don't enter prescription details before the clinical check, you can do so after.
-
Select the Clinical tab, if it's not already selected.
-
If a drug was not entered in the Data Entry tab, in the Drug Name field, search for and select a drug. The drug selection will write back to the Data Entry tab.
If you are performing the clinical check for multiple prescriptions, you can enter multiple drugs by separating them with a backslash (/). Each drug will be separated into its own shell in Intake with the patient copied over.
-
Review the following clinical information:
-
Patient Profile - select the Profile button to view the prescriptions on the patient's Profile. The patient's EHR Profile can be viewed by selecting the EHR link.
A forced view of the EHR Profile will not occur in Rx Detail if the EHR Profile is viewed in Intake, unless a break in service occurs (e.g., navigate to another patient and return).
-
Allergies and Medical Conditions - select a record and the expander button
to view additional details. Add or remove records by selecting the plus or minus buttons. -
Clinical History - select the Clinical History button
to view a list of clinical notes in the Patient Folder. Detail a record to view more information. To add a clinical note, select the Add Clinical Note button. -
Audit History - select Rx > Audit History to view the audit history for the prescription. This button is only available for refills and reauthorizations.
-
-
Review any interaction checks, by highlighting the interaction and selecting Interactions Check. The interactions listed are between the selected drug and the drugs on the Patient Profile.
-
Interactions are sorted in descending order by severity: (1) Contraindicated, (2) Severe, (3) Moderate, and (4) Low.
-
Within each severity category, the interaction types display in the following order: (1) Drug-Allergy, (2) Drug-Drug, (3) Drug-Medical, and (4) Drug-Food.
If Clinical Review is completed before Data Entry, you will not be prompted with interactions when the prescription is processed into Rx Detail, since the interaction check has already been done. However, if clinical information was added since completing Clinical Review, the Interaction Detail window will appear in Rx Detail.
-
-
At the bottom, select Verify. The button will turn green and say Verified.
-
If multiple prescriptions are loaded in the Intake window, select the right arrow button
at the top to move to the next one. Repeat steps 6 - 9 for the next prescription. -
Select Sign Rx(s). The Signature window appears. At the top right, the Rx(s) being signed field indicates the number of prescriptions being signed over the total number loaded in the Intake window.
-
Sign the prescription using one of the following methods:
-
Credential entry - initials of the signing Pharmacist are used.
-
Biometric fingerprint scan - initials of the signing Pharmacist are used.
-
Manual signature using a signature pad or mouse - the initials of the logged in Pharmacist user are assumed. However, the signature of the signing pharmacist is captured and appears on all prescription documentation.
Not all signing methods are available
The methods available depend on the hardware installed at the workstation and whether an E-Signature has been set up for the pharmacist. See Signature Window for more information.
The Sign Rx(s) become turns green and says UnSign. The date and time the prescription was signed displays beside the button.
-
-
Do one of the following:
-
Select the Data Entry tab to continue processing the prescription(s). The prescription will progress through the remaining Workflow steps. In some situations, changes to the prescription will cause the signature to be revoked and Clinical Review will need to be completed again.
Scenarios where the signature is revoked
-
The drug is changed to a non-interchangeable in the Intake window or Rx Detail. A row is added to the Workflow Details window indicating the date and time of the signature removal, user (ADM), and the name and strength of the original drug and new drug.
-
The prescription's drug or SIG is modified during an amend or rebill. No row is added for the signature removal in the Workflow Details window.
-
The patient is changed in the Intake window. No row is added for the signature removal in the Workflow Details window, as the signature is intended for a different patient.
-
-
Select the Dialogue tab to complete dialogue for the prescription(s).
-
Select Add to Workbench to place the current prescription back in the Data Entry queue.
-
To complete Clinical Review from the Workflow queue:
-
From the Workbench, select the Clinical Review queue. Prescriptions that are currently in the Clinical Review queue display in the prescription grid.
-
Select the prescription(s) that require clinical review.
-
Select Process. The prescription opens in the Clinical Review window.
-
Select the expanding arrow
to open the clinical information section. -
Review the clinical information in the following tabs.
-
Clinical Info - displays medical allergies and conditions.
What does the warning indicator mean?
If a warning indicator
appears on the Clinical Info tab, that means a moderate, severe, contraindicated, or drug-allergy interaction exists. You must open the tab and review the information. If this is not done, you will be returned to the Clinical Review window upon selecting Sign Rx, and the Clinical Info tab will be forced open. You must select Sign Rx again to complete Clinical Review. -
Audit History - displays the history of the prescription, such as previous fills and authorizations.
-
Patient Profile - displays the prescriptions on the patient's Profile tab. The patient's EHR Profile can be viewed by selecting the EHR link.
-
Notes - displays notes marked as Print in the Prescription, Prescriber, Drug and Patient Notes tabs.
-
-
Review any interaction checks, by highlighting the interaction and selecting Interactions Check. Interactions are sorted in descending order by severity: (1) Contraindicated, (2) Severe, (3) Moderate, and (4) Low. Within each severity category, the interaction types display in the following order: (1) Drug-Allergy, (2) Drug-Drug, (3) Drug-Medical, and (4) Drug-Food.
-
Select Sign Rx. The Signature window appears.
-
Sign the prescription using one of the following methods:
-
Credential entry - initials of the signing Pharmacist are used.
-
Biometric fingerprint scan - initials of the signing Pharmacist are used.
-
Manual signature using a signature pad or mouse - the initials of the logged in Pharmacist user are assumed. However, the signature of the signing pharmacist is captured and appears on all prescription documentation.
Not all signing methods are available
The methods available depend on the hardware installed at the workstation and whether an E-Signature has been set up for the pharmacist. See Signature Window for more information.
-
Clinical Review can be completed from the Intake window, regardless of your Workflow setup, or from the Workflow queue.
Select the dropdowns to learn more.
The Clinical tab in Intake is visible when Clinical Review is enabled for the prescription type (retail or compliance) being processed. While the tab is visible to all role types, only pharmacists have access to the Verify and Sign Rx(s) buttons. Clinical Review can always be completed at Intake, before Data Entry, even if your Workflow Preferences position it after Data Entry.
To complete Clinical Review from Intake:
-
Do one of the following to open the Intake window:
-
From the Workflow Workbench, select Intake.
-
From the Patient Profile, select Intake.
-
From the Fax tile, select a prescription fax and then Intake.
-
-
Search for and select a patient, if not already entered.
-
Optional - in the Data Entry tab, enter prescription details. If you don't enter prescription details before the clinical check, you can do so after.
-
Select the Clinical tab, if it's not already selected.
-
If a drug was not entered in the Data Entry tab, in the Drug Name field, search for and select a drug. The drug selection will write back to the Data Entry tab.

If you are performing the clinical check for multiple prescriptions, you can enter multiple drugs by separating them with a backslash (/). Each drug will be separated into its own shell in Intake with the patient copied over.
-
Review the following clinical information:
-
Patient Profile - select the Profile button at the top right to view the prescriptions on the patient's Profile.
-
Allergies and Medical Conditions - select a record and the expander button
to view additional details. Add or remove records by selecting the plus or minus buttons. -
Clinical History - select the Clinical History button
to view a list of clinical notes in the Patient Folder. Detail a record to view more information. To add a clinical note, select the Add Clinical Note button. -
Audit History - at the bottom left, select Rx > Audit History to view the audit history for the prescription. This button is only available for refills and reauthorizations.
-
-
Review any interaction checks, by highlighting the interaction and selecting Interactions Check. The interactions listed are between the selected drug and the drugs on the Patient Profile.
-
Interactions are sorted in descending order by severity: (1) Contraindicated, (2) Severe, (3) Moderate, and (4) Low.
-
Within each severity category, the interaction types display in the following order: (1) Drug-Allergy, (2) Drug-Drug, (3) Drug-Medical, and (4) Drug-Food.
If Clinical Review is completed before Data Entry, you will not be prompted with interactions when the prescription is processed into Rx Detail, since the interaction check has already been done. However, if clinical information was added since completing Clinical Review, the Interaction Detail window will appear in Rx Detail.

-
-
At the bottom, select Verify. The button will turn green and say Verified.

-
If multiple prescriptions are loaded in the Intake window, select the right arrow button
at the top to move to the next one. Repeat steps 6 - 9 for the next prescription. -
Select Sign Rx(s). The Signature window appears. At the top right, the Rx(s) being signed field indicates the number of prescriptions being signed over the total number loaded in the Intake window.
-
Sign the prescription using one of the following methods:
-
Credential entry - initials of the signing Pharmacist are used.
-
Biometric fingerprint scan - initials of the signing Pharmacist are used.
-
Manual signature using a signature pad or mouse - the initials of the logged in pharmacist user are assumed. However, the signature of the signing pharmacist is captured and appears on all prescription documentation.
Not all signing methods are available
The methods available depend on the hardware installed at the workstation and whether an E-Signature has been set up for the pharmacist. See Signature Window for more information.

The Sign Rx(s) become turns green and says UnSign. The date and time the prescription was signed displays beside the button.

-
-
Do one of the following:
-
Select the Data Entry tab to continue processing the prescription(s).
Scenarios where the signature is revoked
-
The drug is changed to a non-interchangeable in the Intake window or Rx Detail. A row is added to the Workflow Details window indicating the date and time of the signature removal, user (ADM), and the name and strength of the original drug and new drug.
-
The prescription's drug or SIG is modified during an amend or rebill. No row is added for the signature removal in the Workflow Details window.
-
The patient is changed in the Intake window. No row is added for the signature removal in the Workflow Details window, as the signature is intended for a different patient.
-
-
Select the Dialogue tab to complete dialogue for the prescription(s).
-
Select Add to Workbench to place the current prescription back in the Data Entry queue.
-
To complete Clinical Review from the Workflow queue:
-
From the Workbench, select the Clinical Review queue. Prescriptions that are currently in the Clinical Review queue display in the prescription grid.
-
Select the prescription(s) that require clinical review.
-
Select Process. The prescription opens in the Clinical Review window.
-
Select the expanding arrow
to open the clinical information section.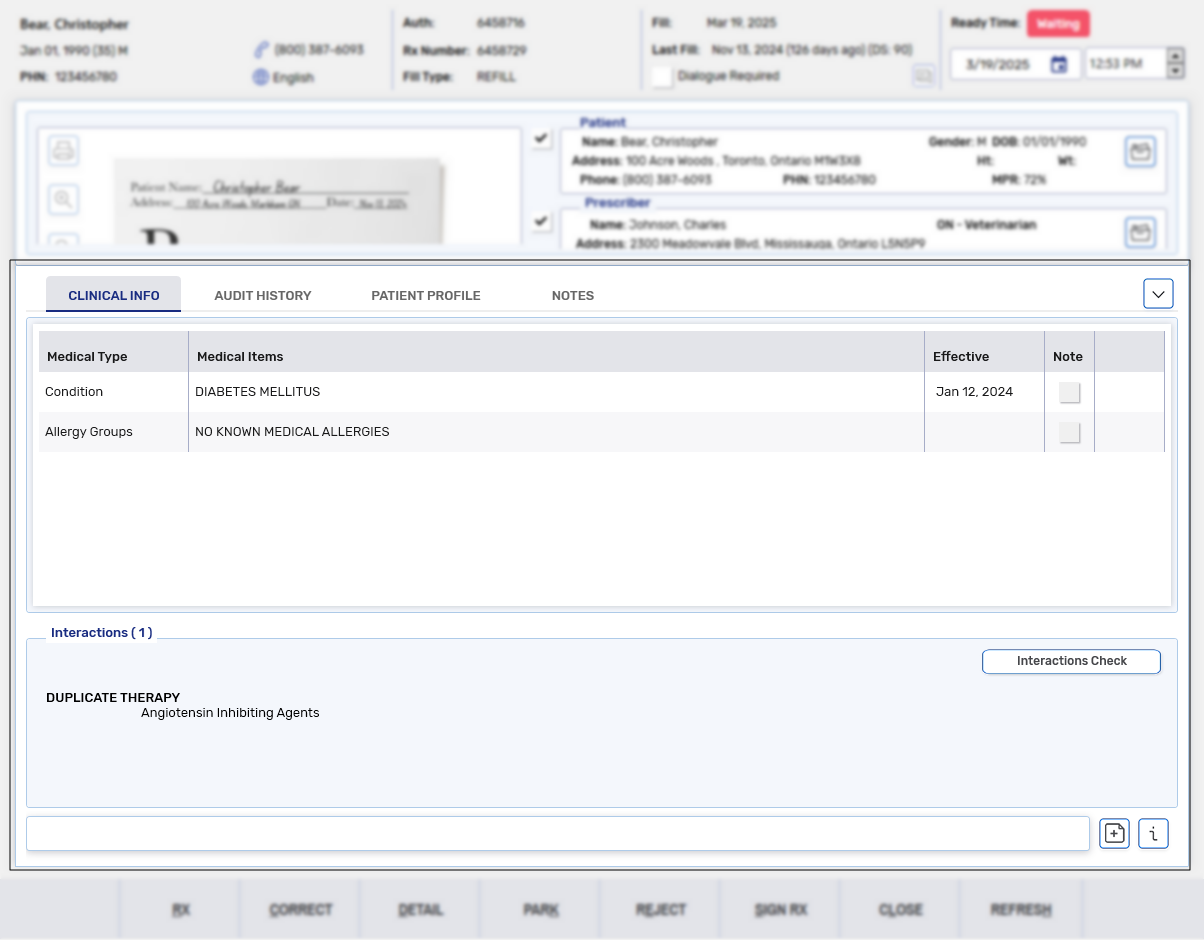
-
Review the clinical information in the following tabs.
-
Clinical Info - displays medical allergies and conditions.
What does the warning indicator mean?
If a warning indicator
appears on the Clinical Info tab, that means a moderate, severe, contraindicated, or drug-allergy interaction exists. You must open the tab and review the information. If this is not done, you will be returned to the Clinical Review window upon selecting Sign Rx, and the Clinical Info tab will be forced open. You must select Sign Rx again to complete Clinical Review. -
Audit History - displays the history of the prescription, such as previous fills and authorizations.
-
Patient Profile - displays the prescriptions on the patient's Profile tab.
-
Notes - displays notes marked as Print in the Prescription, Prescriber, Drug and Patient Notes tabs.
-
-
Review any interaction checks, by highlighting the interaction and selecting Interaction Checks. Interactions are sorted in descending order by severity: (1) Contraindicated, (2) Severe, (3) Moderate, and (4) Low. Within each severity category, the interaction types display in the following order: (1) Drug-Allergy, (2) Drug-Drug, (3) Drug-Medical, and (4) Drug-Food.
-
Select Sign Rx. The Signature window appears.
-
Sign the prescription using one of the following methods:
-
Credential entry - initials of the signing Pharmacist are used. This option is not available for Manitoba or Alberta pharmacies.
-
Biometric fingerprint scan - initials of the signing Pharmacist are used. This option is not available for Manitoba or Alberta pharmacies.
-
Manual signature using a signature pad or mouse - the initials of the logged in Pharmacist user are assumed. However, the signature of the signing pharmacist is captured and appears on all prescription documentation.
Not all signing methods are available
The methods available depend on the hardware installed at the workstation and whether an E-Signature has been set up for the pharmacist. See Signature Window for more information.
-